> ## Documentation Index
> Fetch the complete documentation index at: https://developer.notchpay.co/llms.txt
> Use this file to discover all available pages before exploring further.
# Quickstart Guide
> Get up and running with Notch Pay in minutes
This guide will help you integrate Notch Pay into your application or website quickly. We'll walk through the basic steps to accept your first payment.
Before you begin, make sure you have:
A Notch Pay account (sign up at [business.notchpay.co](https://business.notchpay.co/register) if you don't have one)
Your API keys (available in your dashboard under Settings > API Keys)
Basic knowledge of HTTP requests and JSON
## Integration Steps
1. Log in to your [Notch Pay Business suite](https://business.notchpay.co)
2. Navigate to Settings > API Keys
3. Copy your API key (use your test key for development and testing)
Always use **test keys** during development and testing. Only switch to **live keys** when you're ready to process real transactions.
Test keys contains `test_` while live keys doesn't.
Let's create a basic payment using the Notch Pay API:
```javascript JavaScript theme={null}
// Using fetch in JavaScript
fetch('https://api.notchpay.co/payments', {
method: 'POST',
headers: {
'Authorization': 'YOUR_PUBLIC_KEY',
'Content-Type': 'application/json'
},
body: JSON.stringify({
amount: 5000,
currency: 'XAF',
customer: {
name: 'John Doe',
email: 'john@example.com',
phone: '+237600000000'
},
description: 'Payment for Order #123',
callback: 'https://your-website.com/callback',
reference: 'order_123'
})
})
.then(response => response.json())
.then(data => {
// Redirect the customer to the payment page
window.location.href = data.authorization_url;
})
.catch(error => console.error('Error:', error));
```
```php PHP theme={null}
"https://api.notchpay.co/payments",
CURLOPT_RETURNTRANSFER => true,
CURLOPT_HTTPHEADER => [
"Authorization: YOUR_PUBLIC_KEY",
"Content-Type: application/json"
],
CURLOPT_POSTFIELDS => json_encode([
"amount" => 5000,
"currency" => "XAF",
"customer" => [
"name" => "John Doe",
"email" => "john@example.com",
"phone" => "+237600000000"
],
"description" => "Payment for Order #123",
"callback" => "https://your-website.com/callback",
"reference" => "order_123"
])
]);
$response = curl_exec($curl);
$data = json_decode($response, true);
curl_close($curl);
// Redirect the customer to the payment page
header("Location: " . $data["authorization_url"]);
exit();
```
```python Python theme={null}
import requests
import json
from flask import redirect
url = "https://api.notchpay.co/payments"
headers = {
"Authorization": "YOUR_PUBLIC_KEY",
"Content-Type": "application/json"
}
payload = {
"amount": 5000,
"currency": "XAF",
"customer": {
"name": "John Doe",
"email": "john@example.com",
"phone": "+237600000000"
},
"description": "Payment for Order #123",
"callback": "https://your-website.com/callback",
"reference": "order_123"
}
response = requests.post(url, headers=headers, json=payload)
data = response.json()
# Redirect the customer to the payment page
return redirect(data["authorization_url"])
```
The amount to charge in the smallest currency unit (e.g., cents for USD, kobo for NGN)
The three-letter ISO currency code (e.g., XAF, USD, EUR)
Customer information
Customer's full name
Customer's email address
Customer's phone number (with country code)
Description of what the payment is for
URL to redirect the customer after payment
Your unique reference for this payment
After creating a payment, you'll receive a response with an `authorization_url`. Redirect your customer to this URL to complete the payment:
```javascript JavaScript theme={null}
window.location.href = data.authorization_url;
// Example: https://pay.notchpay.co/pay_123456789
```
```php PHP theme={null}
header("Location: " . $data["authorization_url"]);
exit();
```
```python Python theme={null}
from flask import redirect
return redirect(data["authorization_url"])
```
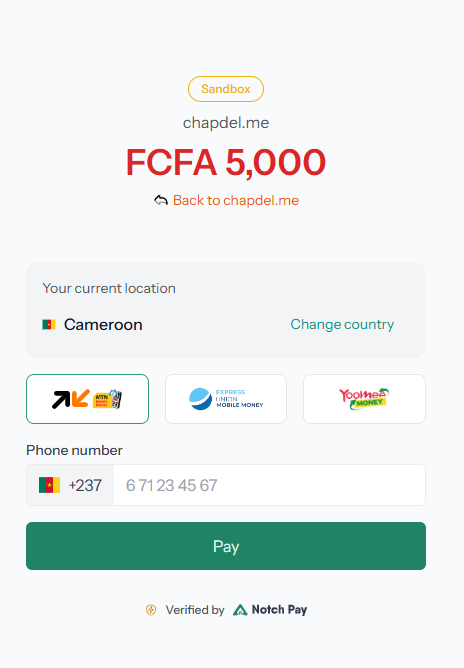 When the payment is completed (or fails), Notch Pay will redirect the customer back to your `callback` URL with the payment status:
```javascript Node.js (Express) theme={null}
// Example callback handler in Express.js
app.get('/callback', (req, res) => {
const reference = req.query.reference;
// Verify the payment status
fetch(`https://api.notchpay.co/payments/${reference}`, {
headers: {
'Authorization': 'YOUR_PUBLIC_KEY'
}
})
.then(response => response.json())
.then(data => {
if (data.transaction.status === 'complete') {
// Payment successful, update your database and show success page
res.send('Payment successful!');
} else {
// Payment failed or is still pending
res.send('Payment not completed.');
}
})
.catch(error => {
console.error('Error:', error);
res.status(500).send('Error verifying payment');
});
});
```
```php PHP theme={null}
"https://api.notchpay.co/payments/{$reference}",
CURLOPT_RETURNTRANSFER => true,
CURLOPT_HTTPHEADER => [
"Authorization: YOUR_PUBLIC_KEY"
]
]);
$response = curl_exec($curl);
$data = json_decode($response, true);
curl_close($curl);
if ($data['transaction']['status'] === 'complete') {
// Payment successful, update your database and show success page
echo 'Payment successful!';
} else {
// Payment failed or is still pending
echo 'Payment not completed.';
}
```
```python Python (Flask) theme={null}
@app.route('/callback')
def callback():
reference = request.args.get('reference')
headers = {
"Authorization": "YOUR_PUBLIC_KEY"
}
response = requests.get(f"https://api.notchpay.co/payments/{reference}", headers=headers)
data = response.json()
if data['transaction']['status'] == 'complete':
# Payment successful, update your database and show success page
return 'Payment successful!'
else:
# Payment failed or is still pending
return 'Payment not completed.'
```
Always verify the payment status on your server before fulfilling orders or providing services to customers.
Callbacks can fail if users close their browsers before being redirected. Webhooks provide a more reliable way to receive payment notifications.
For more reliable payment notifications, set up webhooks to receive real-time updates about payment status changes:
Create an endpoint on your server to receive webhook events:
```javascript Node.js (Express) theme={null}
// Example webhook handler in Express.js
app.post('/webhooks', express.json(), (req, res) => {
const event = req.body;
// Verify webhook signature (recommended for security)
// ...
// Handle different event types
switch (event.type) {
case 'payment.complete':
// Update order status to paid
break;
case 'payment.failed':
// Handle failed payment
break;
// Handle other event types
}
// Acknowledge receipt of the webhook
res.status(200).send('Webhook received');
});
```
```php PHP theme={null}
1. Go to your Dashboard > Settings > Webhooks
2. Add a new webhook with your endpoint URL (e.g., `https://your-website.com/webhooks`)
3. Select the events you want to receive (e.g., `payment.complete`, `payment.failed`)
Always verify webhook signatures to ensure they're coming from Notch Pay and not from an attacker.
Check our [Webhook Security Guide](/get-started/webhooks/verify) for implementation details.
## Next Steps
Congratulations! You've successfully integrated Notch Pay for basic payment processing.
Here are some next steps to enhance your integration:
Offer more payment options to your customers
Save customer information for future payments
Set up reliable payment notifications
Test your integration thoroughly before going live
## Sample Applications
Check out these sample applications to see Notch Pay in action:
Example Node.js integration
Example PHP integration
Example Python integration
## Need Help?
Detailed endpoint documentation
Contact our support team for assistance
Connect with other developers
When the payment is completed (or fails), Notch Pay will redirect the customer back to your `callback` URL with the payment status:
```javascript Node.js (Express) theme={null}
// Example callback handler in Express.js
app.get('/callback', (req, res) => {
const reference = req.query.reference;
// Verify the payment status
fetch(`https://api.notchpay.co/payments/${reference}`, {
headers: {
'Authorization': 'YOUR_PUBLIC_KEY'
}
})
.then(response => response.json())
.then(data => {
if (data.transaction.status === 'complete') {
// Payment successful, update your database and show success page
res.send('Payment successful!');
} else {
// Payment failed or is still pending
res.send('Payment not completed.');
}
})
.catch(error => {
console.error('Error:', error);
res.status(500).send('Error verifying payment');
});
});
```
```php PHP theme={null}
"https://api.notchpay.co/payments/{$reference}",
CURLOPT_RETURNTRANSFER => true,
CURLOPT_HTTPHEADER => [
"Authorization: YOUR_PUBLIC_KEY"
]
]);
$response = curl_exec($curl);
$data = json_decode($response, true);
curl_close($curl);
if ($data['transaction']['status'] === 'complete') {
// Payment successful, update your database and show success page
echo 'Payment successful!';
} else {
// Payment failed or is still pending
echo 'Payment not completed.';
}
```
```python Python (Flask) theme={null}
@app.route('/callback')
def callback():
reference = request.args.get('reference')
headers = {
"Authorization": "YOUR_PUBLIC_KEY"
}
response = requests.get(f"https://api.notchpay.co/payments/{reference}", headers=headers)
data = response.json()
if data['transaction']['status'] == 'complete':
# Payment successful, update your database and show success page
return 'Payment successful!'
else:
# Payment failed or is still pending
return 'Payment not completed.'
```
Always verify the payment status on your server before fulfilling orders or providing services to customers.
Callbacks can fail if users close their browsers before being redirected. Webhooks provide a more reliable way to receive payment notifications.
For more reliable payment notifications, set up webhooks to receive real-time updates about payment status changes:
Create an endpoint on your server to receive webhook events:
```javascript Node.js (Express) theme={null}
// Example webhook handler in Express.js
app.post('/webhooks', express.json(), (req, res) => {
const event = req.body;
// Verify webhook signature (recommended for security)
// ...
// Handle different event types
switch (event.type) {
case 'payment.complete':
// Update order status to paid
break;
case 'payment.failed':
// Handle failed payment
break;
// Handle other event types
}
// Acknowledge receipt of the webhook
res.status(200).send('Webhook received');
});
```
```php PHP theme={null}
1. Go to your Dashboard > Settings > Webhooks
2. Add a new webhook with your endpoint URL (e.g., `https://your-website.com/webhooks`)
3. Select the events you want to receive (e.g., `payment.complete`, `payment.failed`)
Always verify webhook signatures to ensure they're coming from Notch Pay and not from an attacker.
Check our [Webhook Security Guide](/get-started/webhooks/verify) for implementation details.
## Next Steps
Congratulations! You've successfully integrated Notch Pay for basic payment processing.
Here are some next steps to enhance your integration:
Offer more payment options to your customers
Save customer information for future payments
Set up reliable payment notifications
Test your integration thoroughly before going live
## Sample Applications
Check out these sample applications to see Notch Pay in action:
Example Node.js integration
Example PHP integration
Example Python integration
## Need Help?
Detailed endpoint documentation
Contact our support team for assistance
Connect with other developers